If your website is built on WordPress, blogging is just a few clicks away. This step-by-step guide will show you how to create and publish a blog post—and how to ensure it appears on your designated blog page.
How to Add a Blog Post in WordPress
- Log into your WordPress Dashboard
You can usually access this at yourwebsite.com/wp-admin. - Go to Posts in the left-hand menu.
- Click “Add New”
You can either select Add New from the Posts submenu or click the Add New button at the top of the Posts screen. - Enter your blog title
This will become the headline of your post and part of the blog post URL (also known as the permalink). - Add your blog content
Use the Editor to write your content. You can add text, images, links, bullet points, headings, and more. - Add a featured image
In the right-hand sidebar, scroll to find the Featured Image section and upload an image for your post.
Tips for featured images:- Use JPG, PNG, or WEBP format
- Minimum size: 200 x 200 pixels
- Name your image file using keywords that match your blog topic
- Click “Publish”
When you’re finished writing and reviewing your post, click Publish to make it live on your site.
How to Set Up a Blog Page in WordPress
If this is your first blog post, WordPress may still be set to display posts on your homepage by default. To create a separate Blog page, follow these steps:
Step 1: Create the Blog Page
- Go to Pages in the WordPress menu.
- Click Add New.
- Title the page “Blog” (or something else if you prefer).
- Click Publish.
Step 2: Assign the Blog Page in Your Settings
- In the Dashboard, go to Settings > Reading.
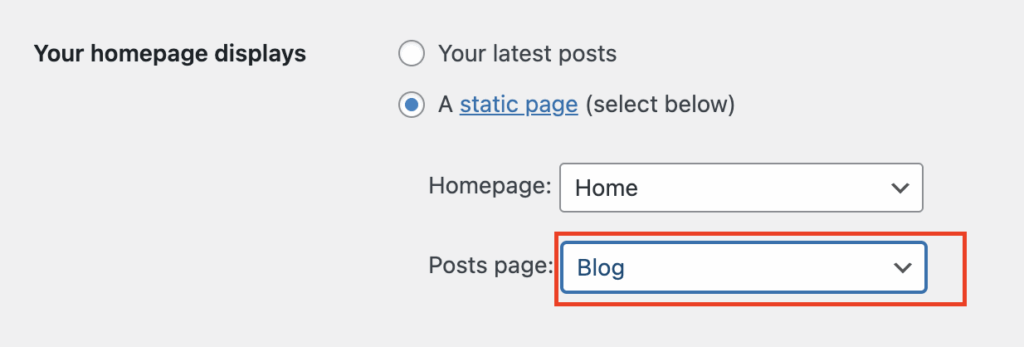
- Under “Your homepage displays,” select A static page.
- For the “Posts page,” choose the new Blog page you just created.
- Click Save Changes.

Verify the Setup
Once everything is published and saved, visit your website and click on your Blog page link. You should see your most recent post listed there.
Need Help Getting Started?
If you’d like guidance setting up your blog or creating content that supports your business goals, Ruby Moon Designs offers free consultations. Get in touch today—we’d love to help you build a blog that works.


